In this blog post, we'll delve into the process of implementing authentication in Unity, along with user account linking and unlinking using PlayerPrefs. Let's break down each step, from setting up the UI canvas to managing player data effectively.
Introduction: Understanding Authentication in Unity
Authentication is crucial for creating secure user experiences in Unity projects. By implementing authentication, developers can enable features such as user accounts and personalised settings. In this guide, we'll explore how to integrate authentication into a Unity project using PlayerPrefs, Unity's built-in system for storing player preferences.
Let's start with a playback of the final result.
 |
| Fig 1. Authentication in Unity | Playback |
Setting Up the UI Canvas: Creating User-Friendly Interfaces
The first step is to create a UI canvas to house our authentication panels. We'll design three main panels: Registration, Login/Authentication, and Linked Account. These panels will guide users through account creation, login, and account management.
🟢 Registration snippet
🟨 C#
🟦 Unity3D
            public void RegisterStart() { StartCoroutine(Register()); }

IEnumerator Register() {

  string jsonString =
      "{\"username\":\"" + reg_username.text + "\", \"password\":\"" + reg_password.text + "\"}";
  UnityWebRequest request = UnityWebRequest.Post(
      "https://masters-of-mischief-3.onrender.com/register", jsonString, "application/json");

  regBtnText.text = "Registering ...";
  yield return request.SendWebRequest();
  Debug.Log(request.downloadHandler.text);
  if (request.result != UnityWebRequest.Result.Success) {
    infoReg.text = "Couldn't register. Try again";
    infoReg.color = Color.red;
  } else {
    infoReg.text = "Registration Successful! username: " + reg_username.text;
    infoReg.color = Color.green;
  }
  regBtnText.text = "Register";
  reg_username.text = "";
  reg_password.text = "";
}
🟢 Authnetication snippet🟨 C#🟦 Unity3Dpublic void AuthenticateStart() { StartCoroutine(Authenticate()); }
IEnumerator Authenticate() {
string jsonString =
"{\"username\":\"" + log_username.text + "\", \"password\":\"" + log_password.text + "\"}";
UnityWebRequest request = UnityWebRequest.Post(
"https://masters-of-mischief-3.onrender.com/authenticate", jsonString, "application/json");
logBtnText.text = "Authenticating ...";
yield return request.SendWebRequest();
if (request.result != UnityWebRequest.Result.Success) {
infoLog.text = "Couldn't authenticate. Try again";
infoLog.color = Color.red;
} else {
string data = request.downloadHandler.text;
PlayerPrefs.SetString("linked_account", data);
}
logBtnText.text = "Link Account";
log_username.text = "";
log_password.text = "";
CheckAndApplyForLinkedAccount();
}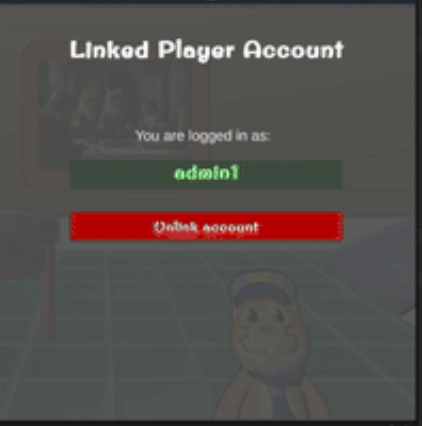 |
| Fig 2. Linked Account panel in action |
Managing Player Data: Storing Data Securely with PlayerPrefs
PlayerPrefs provides a secure solution for storing player preferences, including authentication-related information like usernames. By leveraging PlayerPrefs, developers can ensure that player data is securely stored locally on the device.
🟢 PlayerDataSer class🟨 C#🟦 Unity3Dpublic class PlayerDataSer {
public int id;
public string username;
}Handling Account Links and Logout: Ensuring Security and Convenience
Logout functionality is integrated for securely logging out and clearing locally stored account data. Logout is nothing but a simple deletion of the PlayerPrefs key. After login or logout, the system checks for linked accounts in PlayerPrefs. Depending on the presence of a linked account, the Authentication or Linked Account panel is displayed.
🟢 Check For Linked Account🟨 C#🟦 Unity3Dvoid CheckAndApplyForLinkedAccount() {
if (PlayerPrefs.HasKey("linked_account")) {
linkedPanel.SetActive(true);
PlayerDataSer playerData =
JsonUtility.FromJson<PlayerDataSer>(PlayerPrefs.GetString("linked_account"));
linkedText.text = playerData.username;
loginPanel.SetActive(false);
return;
}
linkedPanel.SetActive(false);
loginPanel.SetActive(true);
}
Comments
Post a Comment